How to Mount the Nice Apollo Juno Gate Opener 310 Control Board
The Nice Apollo Juno Gate Opener is a versatile solution for automating gate operations, offering three primary installation methods: concrete pad mount, concrete pad with a 4-inch riser, and metal post mount. Each method is designed to accommodate different site requirements and preferences, ensuring a secure and efficient setup. This guide provides detailed instructions and important considerations for each mounting option, allowing you to successfully install the Juno Gate Opener while adhering to safety standards and best practices.
General Preparations for Installation
Tools and Materials Needed:
- Wire cutters/strippers
- Basic hand tools (screwdrivers, wrenches, pliers, etc.)
- Drill with assorted bits
- Mounting hardware (bolts, washers, etc.)
- Electrical conduits, wire nuts, grommets, asphalt patch (if required)
Pre-Installation Checklist:
- Ensure the gate's weight and dimensions are within specified operating limits.
- Verify there are no points of friction or derailing risks for the gate.
- Confirm the gate is balanced and does not move freely when positioned.
- Plan for electrical connections and conduits.
- Position the operator to allow safe and easy manual release.
- Comply with local codes regarding grounding and electrical installations.
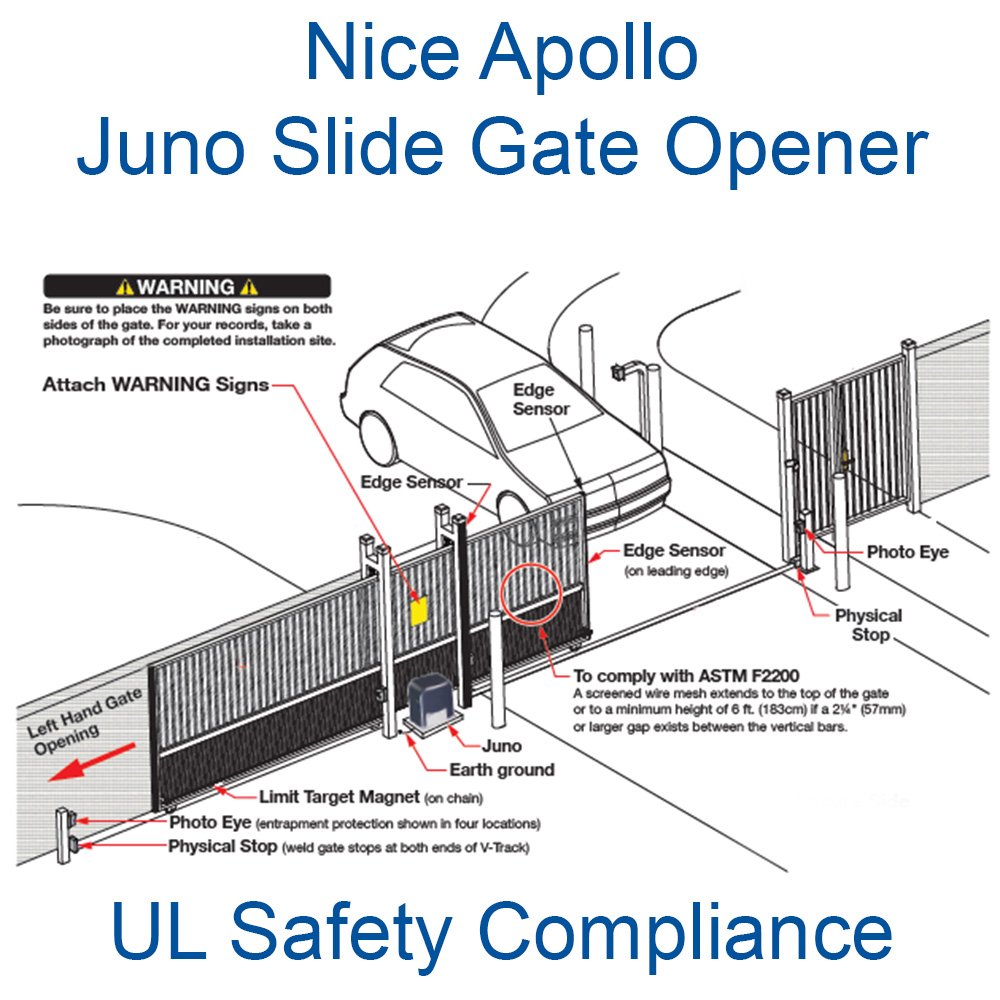
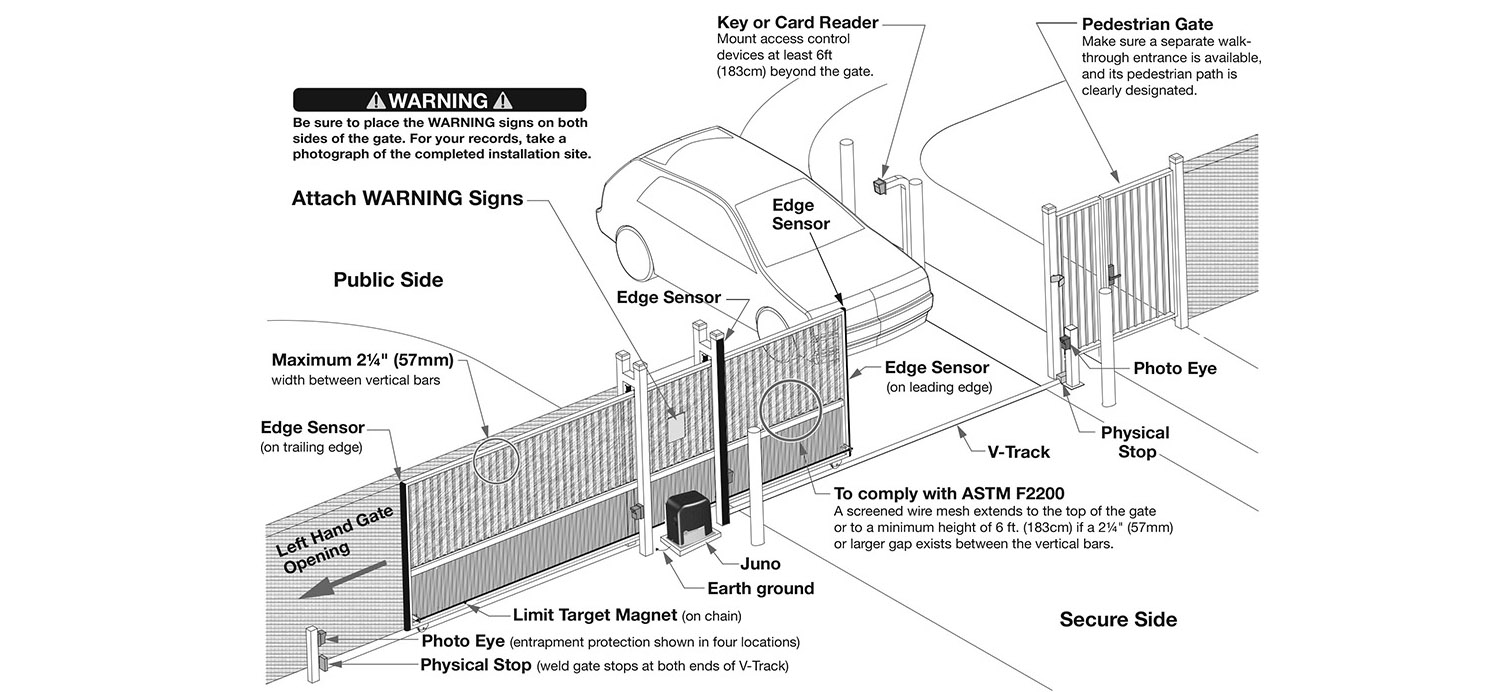
- Install warning signs and entrapment sensors as needed.
Mounting Options
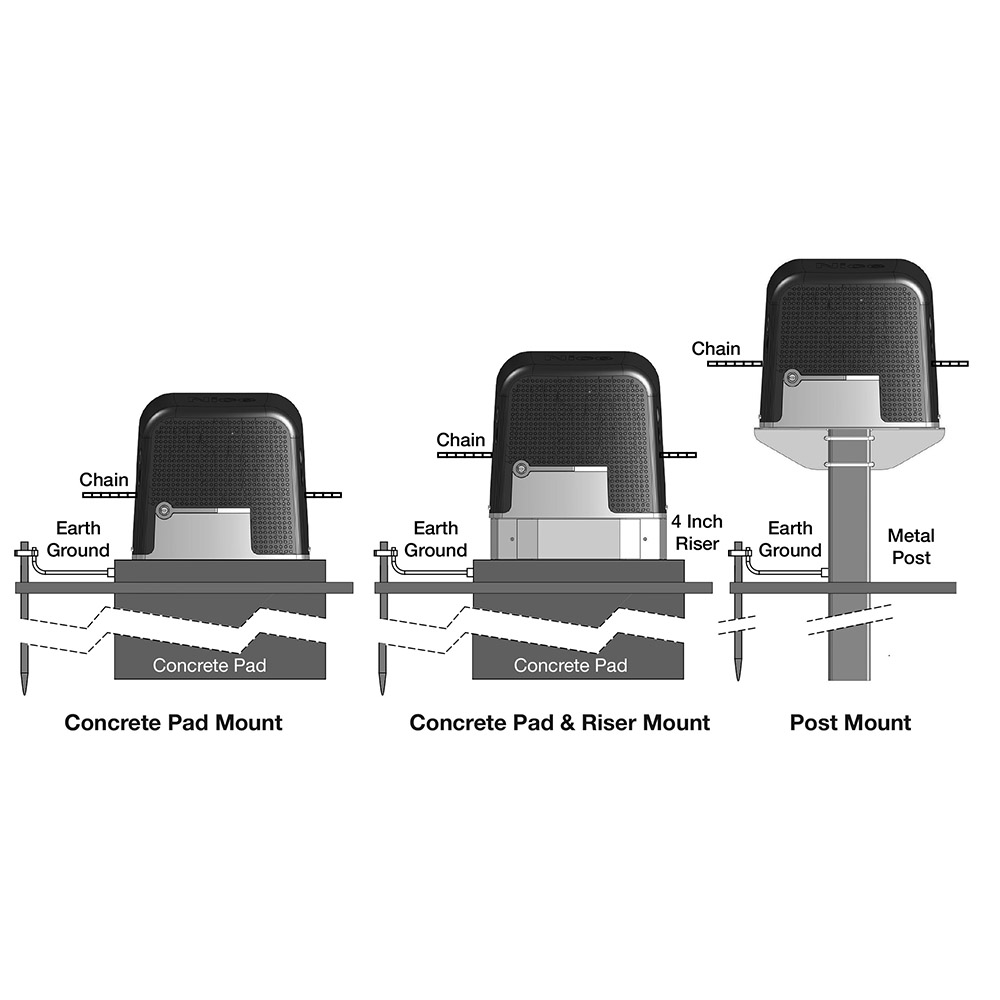
1. Concrete Pad Mount
Concrete Pad Preparation:
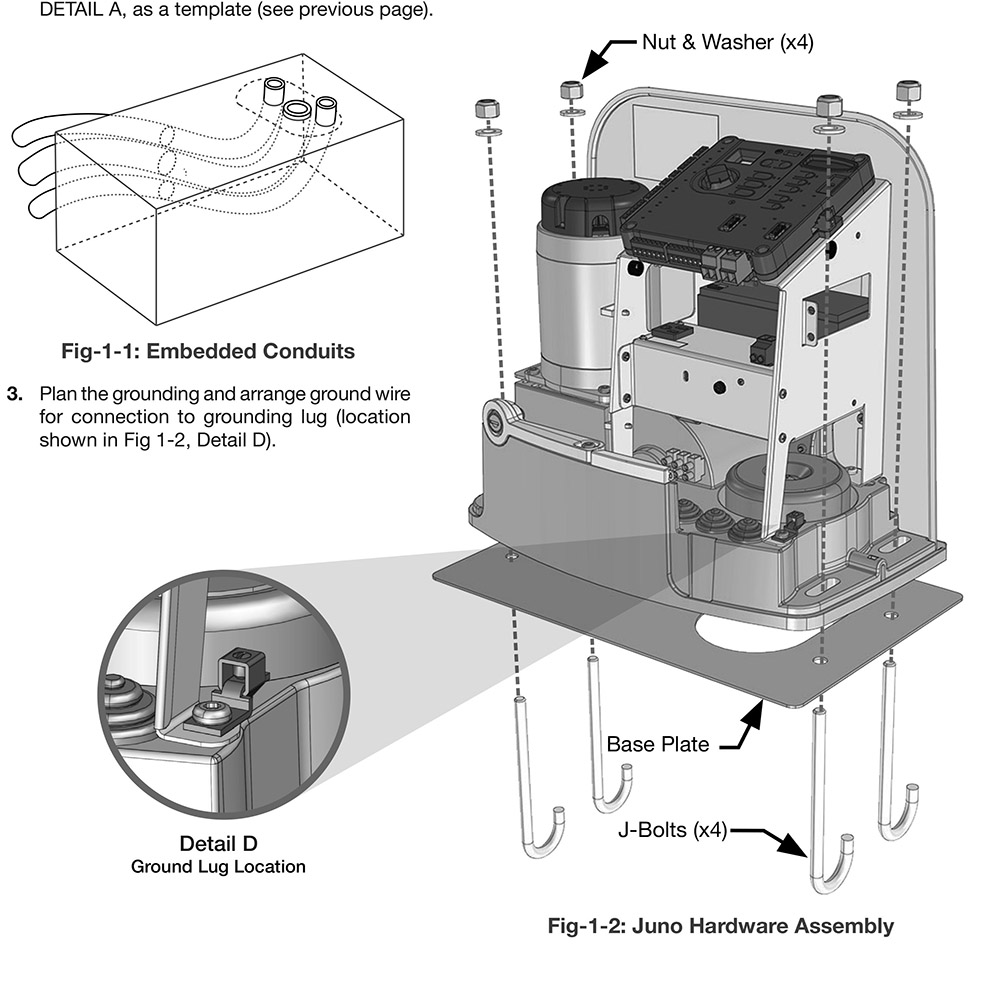
- Determine the frost line and pour a concrete pad at least 16 inches deep with a minimum 2-inch extension above ground.
- Embed conduits for high voltage and low voltage wiring before the concrete sets.
- Use the Juno baseplate as a template for conduit placement.
Baseplate Installation:
- Place the baseplate on the pad.
- Secure the baseplate using J-bolts or concrete anchors:
- J-Bolts: Embed J-bolts into the concrete while it is still wet.
- Concrete Anchors: Drill holes after the pad has cured and secure the baseplate.
- Ensure the baseplate is level and aligned with the gate.
Operator Attachment:
- Attach the Juno operator to the baseplate using the provided hardware.
- Verify alignment and ensure the chain path is parallel to the gate.
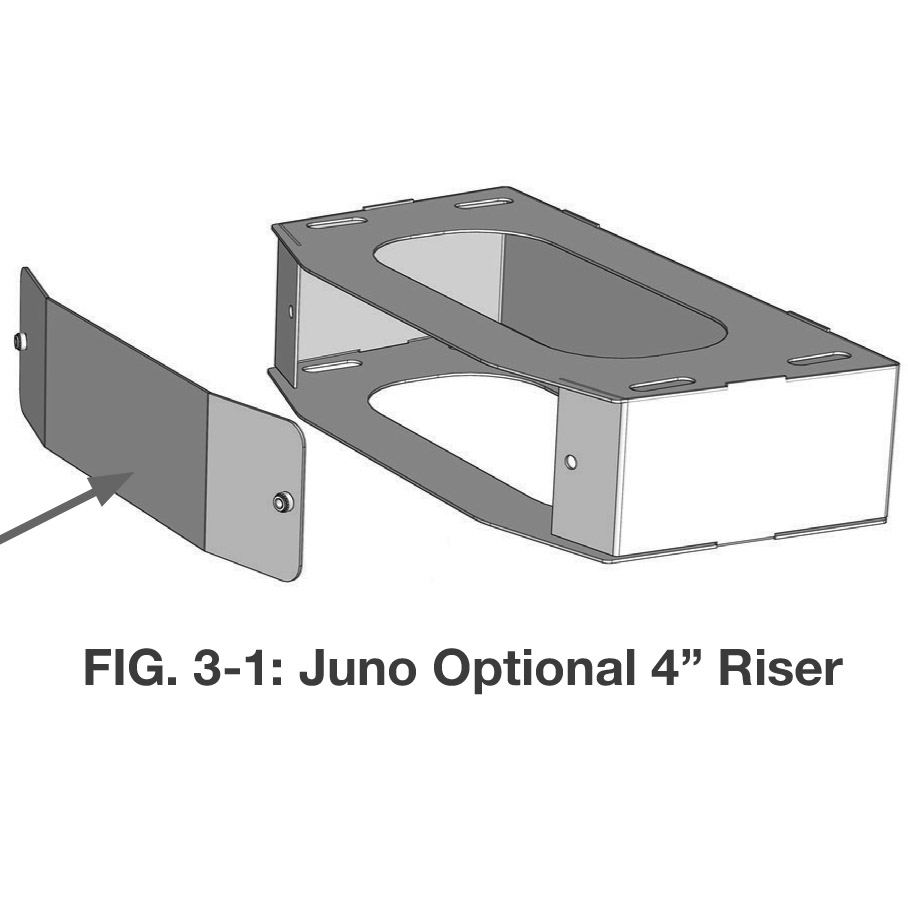
2. Concrete Pad with 4-Inch Riser
Riser Installation:
- Install the 4-inch riser on the concrete pad using bolts, washers, and nuts.
- Align the riser with the pre-installed conduits.
Operator Attachment:
- Mount the Juno operator onto the riser.
- Use the slots provided on the riser for securing the operator.
Final Checks:
- Ensure all bolts are tightened, and the operator is secure.
- Verify that the chain path aligns with the gate.
Shop Juno Base Riser Kit
3. Metal Post Mount
Post Preparation:
- Use a 4”x4” steel metal post made from durable, corrosion-resistant material to ensure longevity.
- Cut the post to the desired height based on site requirements, ensuring it allows for proper alignment with the gate chain.
- Ensure the post is securely anchored into the ground using concrete or an equivalent stable foundation to prevent movement.
Mounting Plate Attachment:
- Attach the mounting plate to the post using 3/8-inch U-bolts or weld it directly to the post for a more permanent installation.
- Ensure the mounting plate is level and oriented correctly to align with the gate operator and chain path.
- Double-check all bolts and welds for secure attachment, as this will bear the weight of the operator.
Operator Installation:
- Secure the Juno operator to the mounting plate using the provided 7/16-inch hardware, tightening all bolts evenly.
- Align the operator carefully with the gate, ensuring that the drive chain path is parallel and positioned for smooth operation.
- Inspect all connections and the chain alignment before proceeding with electrical wiring or testing.
- Once installed, test the stability of the setup by gently shaking the post and operator to ensure it remains firmly in place.
Complete Juno Installation
Additional Considerations
Electrical Connections:
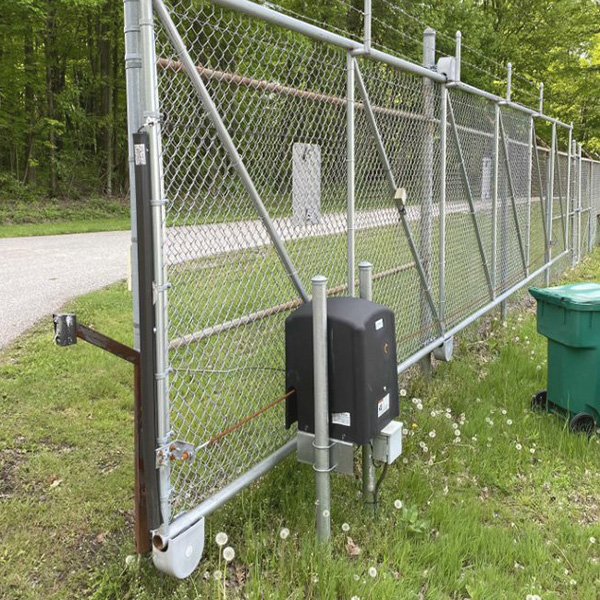
Proper electrical connections are crucial for the safe and efficient operation of the Juno Gate Opener. High voltage and low voltage wiring should be run through separate conduits to prevent interference and ensure safety. The ground wire must be securely connected to the grounding lug, as shown in the manufacturer’s guidelines. Adherence to local electrical codes is essential during this step.
Chain Alignment:
The alignment of the chain is a critical aspect of the installation process. The chain path must be parallel to the gate to avoid unnecessary wear and ensure smooth operation. Proper alignment not only enhances performance but also extends the lifespan of the operator and associated components. Detailed measurements should be taken to achieve the specified chain-to-gate dimensions.
Safety Measures:
To maximize safety, install entrapment protection devices such as photo eyes and edge sensors. These devices help detect obstacles in the gate’s path and prevent accidents. Warning signs should also be placed on both sides of the gate to inform users of potential hazards. These measures are critical for meeting safety standards and ensuring user awareness.
Maintenance Access:
Maintenance access should be prioritized during installation to facilitate future servicing. The operator’s manual release mechanism should be easily accessible in case of power outages or other emergencies. For setups involving the 4-inch riser, the removable front panel provides convenient access for maintenance tasks, ensuring that the operator remains in optimal condition.
Contact Us
The all-new Juno 310 AC and Juno 310 Solar residential slide gate operators from Apollo set a new standard in gate automation technology. Whether you're seeking a reliable AC-powered solution, an eco-friendly solar-powered option, or expert guidance for your next gate opener project, our knowledgeable sales team is here to help. If you have any questions, feel free to reach out or visit our Resources Hub for instructional guides, detailed specifications, and more informational content. Elevate your property with the innovation, convenience, and reliability of the Juno series - experience the future of gate automation today!